Currently, people like taking photos with mobile phone, but how to transfer photos from Android to iPhone? They are different systems, which is the problem in many people's mind. Don't worry now, you will get 6 excellent solutions to solve this problem. In these ways, you will find that you can transfer pictures easily and it can keep the same quality.
If you want to transfer pictures in different operation systems, Android to iPhone Transfer would be the best tool to help you. With it, you can transfer pictures from Android to iPhone or iPad in ease and vice versa. From now on, you will never miss your valuable and beautiful photos.
Key Features & Highlights of Android to iPhone Transfer
- Transfer your data such as photos, videos, contacts, messages, call logs and other media files from Android to iPhone/iPad/iPod easily.
- Send data from iPhone/iPad/iPod to Android device automatically.
- Support both Android system and iOS system including the latest version iOS 13 in safety.
In addition, Android to iPhone Transfer supports iPhone 14/13/12/11 Pro Max/ 11 Pro/11, iPhone XS Max/XS/XR/X/8 Plus/8/7 Plus/7/6s Plus/6s/6 Plus/6, iPad Pro, iPad Air 2/Air, iPad 3/2/1, iPad mini, iPad mini with Retina display, iPod touch 8/7/6/5/4/3/2. It also supports Android device, including Huawei, Xiaomi, Samsung, HTC, OPPO, Vivo, LG, ZTE and so on.
You can download free here.
Now, you can get the using guide to transfer photos.
Step 1. Install Android to iPhone Transfer and Connect
- Please download Android to iPhone Transfer on your computer in advance. Then, install it with guiding steps. Install successfully, enter it and you can see the interface as below.
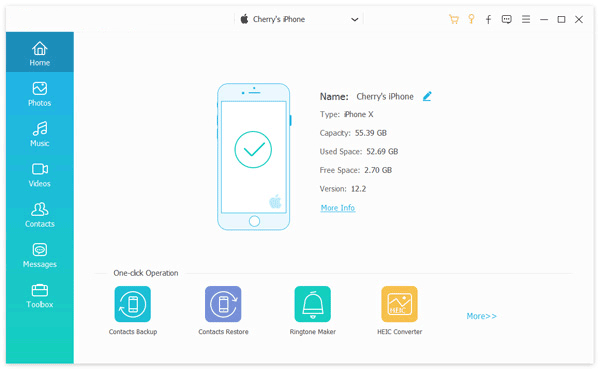
- In this step, you can use the USB cable to connect two devices to PC simultaneously. Please enable USB debugging on your Android phone with the onscreen prompts.
Step 2. Detect Your Two Phones and Set Devices
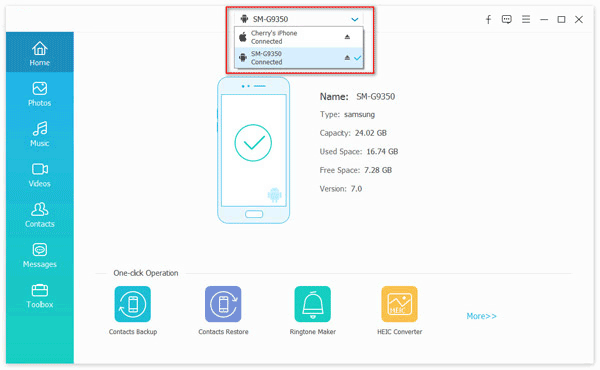
After connection, please select your Android phone on the device list. Or you can tap the dropdown icon to choose your Android gadget.
Step 3. Choose the Photos and Start to Send
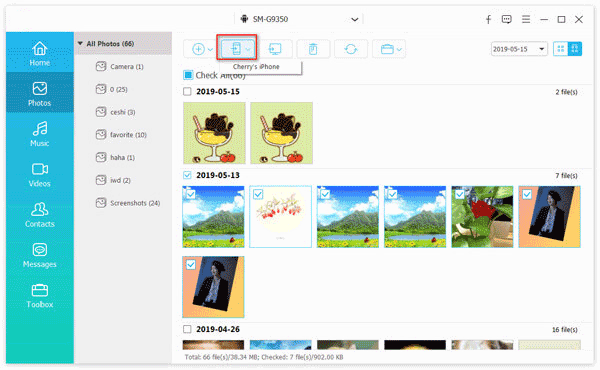
Choose the "Photos" option, and select the photos you plan to transfer. Finally, tap the "Export to Device" icon to choose your iPhone. Then the software will import your photos to the iPhone.
Read more:
9 Excellent Apps to Transfer Data from Android to iPhone [Ultimate]
7 Solutions to Fix Move to iOS Transfer Interrupted [Updated]
To transfer photos from Android to iPhone with Move to iOS App would be a simple solution, and you can download Move to iOS freely on Google Play. It supports all the versions of mobile phone above Android 4.0 and iOS 9 or higher.
Here's the guide:
1. Before Beginning
Please make sure your WiFi turn-on on your Android device. You'd better plug your two devices into power. Additionally, if you want to transfer Chrome bookmarks, please upgrade the latest version of Chrome on your Android phone.
2. Set up iPhone and Tap on "Move Data from Android" Option
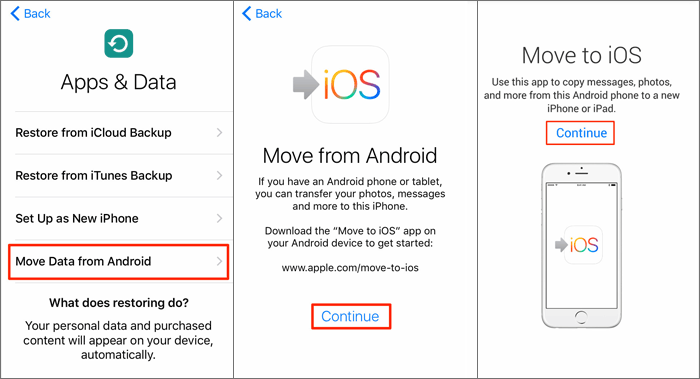
If your iOS device is new and has not been set up, please set it up until "Apps & Data" appears on the screen. Then tap on "Move Data from Android" option. If your iOS device has been set up already, please ignore the step.
3. Install Move to iOS on Android
In this step, download and install Move to iOS App on your Android phone and click "Continue". Next, read the appearing terms and conditions on the Android device. Tap on "Agree" to continue. Now, tap on "Next" of Find Your Code screen.
4. Wait for a Code on iOS Device
On your iOS device, click "Continue" and wait for a code which is 10-digi or 6-digi to display. If your Android phone appears a warning that your Internet connection is weak, please ignore it.
5. Enter the Code and Wait
Please enter the code which shows on iOS device on your Android phone. Then, you need to wait for the connection between iOS device and Android device.
6. Choose the Content and Transfer
Select your contents on your Android phone which you want to transfer. Then click "Next" on Android phone. Until both devices are appearing completing, your transferring process is finishing. This process will need a while, which depends on how much the contents you want to transfer.
7. Finish
When the transferring process is completing, taps on "Done" on your Android device and continue your setup on your iOS device.
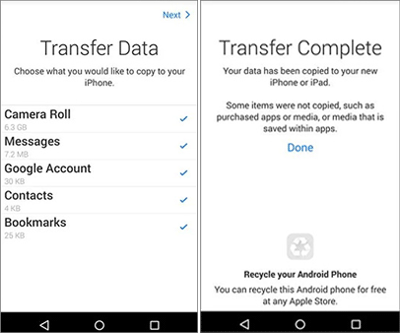
Notes: You can transfer your contacts, messages, photos, videos, calendars web bookmarks and mail account with Move to iOS. And the apps that are supported in Google Play and App Store can be transferred as well. Therefore, the other files like songs, PDFs need sending manually.
iTunes is one of the latest entertainment apps which you can enjoy the top music, fantastic movies and films and so on. What's more, you can use it to transfer pictures from Android to iPhone. That will be a convenient tool for you. Then, how to send pictures from Android to iPhone with iTunes? Please go ahead.
Please follow the following steps.
1. Backup Your Data to PC
First of all, please transfer your photos from Android phone to computer via USB cable. Select a location on your PC to save your photos. You'd better put the photos in the same folder. Now disconnect your Android device to computer.
2. Install iTunes on PC
Please download iTunes and install it on your tablet. Then launch it. Make sure that the version of iTunes is latest. You can check the version on the "Help" of the menu when you open iTunes.
3. Connect Your iPhone to Computer
After launching iTunes, connect your iPhone to computer via USB cable.
4. Find the Folder and Sync Photos
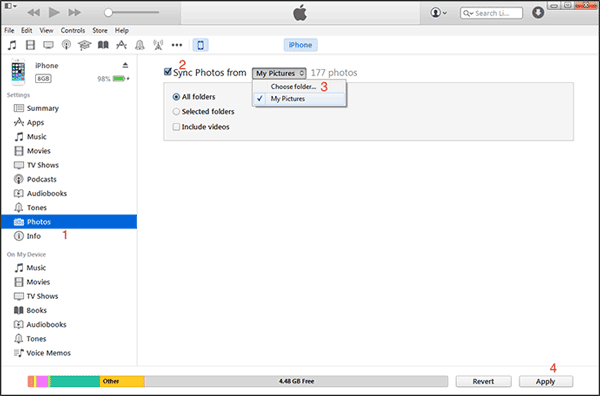
On iTunes, click the phone-like icon, click "Photos" of the list on the left. Tick "Sync Photos" at the top right, then select your desired folder at "Copy photos from". Finally, tap on "Apply" at the bottom right of the interface.
5. Wait for a While
Just wait for a minute to finish the transferring process.
See also:
Fretting about how to move data from Motorola to an iPhone? In this case, please click this link and learn about the reliable approaches.
You can fast cast your iPhone to an iPad with these methods. Let's take a look.
If you would like to transfer pictures from Android to iPhone, or send other types of data, Google Drive which was released in 2012 can be helpful. You can get 15GB free storage space with it. For your convenience, please follow the tutorial step by step.
1. Install Google Drive
At the beginning, you can download Google Drive, and then install to your Android phone. If you don't have a Drive account before, you need to create one on your Android phone. Just follow the hint on the app to create your personal account.
2. Upload Pictures to Google Drive
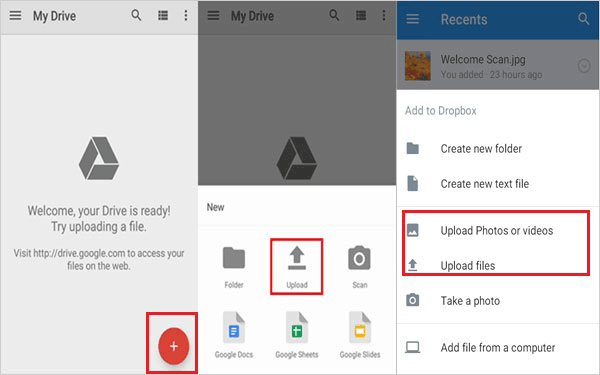
- After launching the app, you will see the "+" icon in red and click it. Next, tap on "Upload" on the page.
- Now you can see a pop-up list, choose "Upload Photos or videos" and select the photos you hope to transfer.
3. Create a Name of Folder on Google Drive to Save Photos
Add a title to your folder if you hope to create a name of the folder that saves your pictures. Then click "Save" icon at the bottom right on your screen. After a while, this uploading process could be finished.
4. Turn to Your iPhone
In the step, please focus on your iPhone, install Google Drive on it in advance. Launching it with the same Drive ID. Then you will find the folder you just uploaded your photos. So you can download the photos to your iPhone.
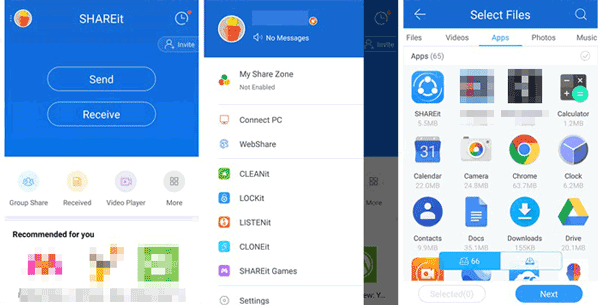
SHAREit is a kind of useful tool which is developed by Apple to send photos from Android to iPhone as well. And you can get the tips about how to transfer photos from Android to iPhone as well as PC with it in this section.
Here's how:
1. At first, download and install SHAREit both on your Android and iPhone.
2. Please launch the app on your Android phone. If you are the first time to launch the app, please click " Start" on it and set your name and avatar to your Android phone.
3. After you are done with it, click on "RECEIVE" on the screen. Then the app will tell you to wait for a sender now, you can see "Waiting for sender" on your Android phone. As you want to connect iPhone, click "Connect to iOS/WP".
4. In this time, the app will show that you need to search for WiFi on your iPhone. You may need to follow the instructions shown on the iPhone. Please choose the WiFi hotspot that is sent by your Android phone.
5. After connecting the WiFi hotspot, please launch SHAREit on your iPhone again. Then you can see two devices are ready, they can transfer your photos with each other.
In this part, you can transfer your photos from Android to iPhone in the simplest way -- drag and drop. With it, you needn't to download or install any app on your devices. Just prepare the USB cables of two devices.
Here's the tutorial:
1. First of all, link your Android phone and iPhone to the computer via USB cables. Enable USB debugging mode on your devices.
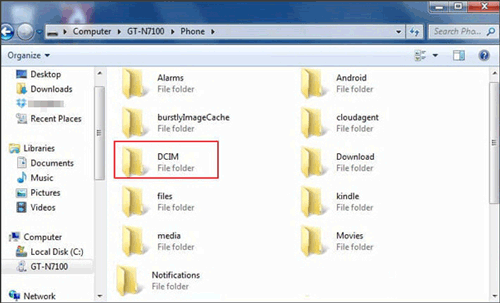
2. After that, click "My PC" (or "This PC") on the computer and find your Android hard disk here.
3. Go to DCIM folder and choose the images your wish to copy.
4. Create a temporary folder on your computer, then drag the images you just chose to the folder.
5. Go to iPhone hard disk which you can find it in "My PC" as well.
6. Enter iPhone hard disk and select a location to put the folder. Now, copy or drag the folder to this location and wait for a while to complete the transfer.
Photos are the precious memory in your life because we usually take photos when the moment is joyful and valuable. If you wish to transfer pictures between the Android system and the iOS system, that would be trouble for you before you haven't read this article. That is, you will never be annoyed with this matter from now on. You have had the key already to transfer photos from Android to iPhone.
Related Articles
How to Transfer Photos from Android to Android
[Fast Transfer] How to Transfer Your Photos from iPhone to Android Effectively
How to Transfer Photos from iPhone to Samsung
Simple Ways to Transfer Files from Android to iPhone
Simple Way to Transfer Files from iPhone to Android
Copyright © samsung-messages-backup.com All Rights Reserved.