"Does KingRoot wipe data? I am going to root my Android phone to remove some pre-installed apps. But there are great numbers of files on my phone. I can't stand losing them..."
Are you still fretting about this problem like the mentioned above? First of all, rooting a phone will delete all data generally. So, you'd better know how to back up the Android phone before rooting. There are 5 handy methods to back up your Android phone, and their detailed guides are displayed in the following. Please select one suitable way based on your demands.
Tip 1: Does rooting your phone delete everything?
"Will rooting wipe my phone?" This question is asked by many people recently. In general, rooting itself will not delete files on the device, but it will remove temporary files. Then, why did you lose everything after rooting? Because during the process, your device requires you to unlock the bootloader in advance before rooting, which contains the factory reset. Thus, all your data will be gone after rooting.
Tip 2: What to do before rooting your phone?
Besides backup, there are still multiple things to do before rooting your phone. Make sure you have fully charged the battery. Then download a suitable driver for your Android phone on the computer, and enable the USB debugging feature on Android. Next, select a reliable and useful rooting tool.
See also: Here are detailed tips about Android rooting software for your reference. You can learn about their features, pros, cons, and more.
In order to keep your Android data secure, it is necessary to back up Android before root. This Android backup manager - Samsung Backup and Restore, is capable of solving this problem. In other words, it is good at Android phone backup. Furthermore, it can also restore the backup data to the phone in 1 click.
- One-click to back up Android files to the PC.
- Efficiently restore the backup files from the computer to the mobile device.
- Support multiple data types, including contacts, apps, text messages, call history, photos, videos, music, and more.
- Allow you to select file types before backup and restore.
- Transfer your files without changing formats or losing quality.
- Support a wide range of Android phones and tablets, such as ZTE nubia Red Magic 8 Pro/7S Pro/7S/7/6s Pro/6s/Blade V40 Pro/V40/A72, Samsung Galaxy S23/S22/S21/S20/Note 20, Sony Xperia 1 IV/Xperia 5 IV/Xperia 10 IV/Xperia Pro-I, Huawei, Google, HTC, Motorola, OnePlus, and so on.
Download the Android backup program for free below.
Step 1. Install the Program
Please download and install the backup software on your computer, and run it on the desktop.
Step 2. Establish a Connection
Use your USB cable to establish the connection between the Android phone and the computer. Then enable the USB debugging mode on the phone. It will recognize your phone quickly.
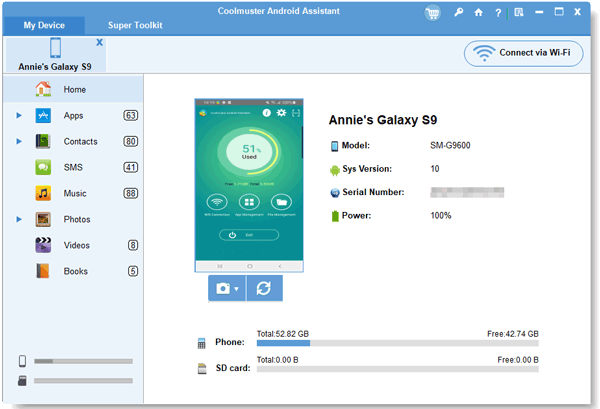
Step 3. Back Up Android Phone to PC
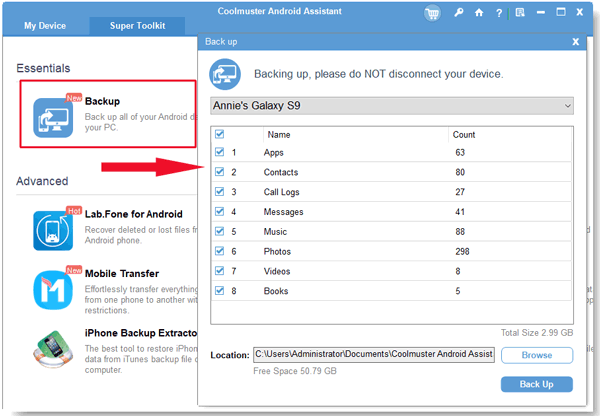
- Click the "Backup" option, and tick the data types you want on the interface. If needed, you can choose a location on the computer to save the backup data.
- Finally, tap the "Back Up" button to begin the backup procedure.
Bonus:
You can also back up Android to Mac with these 6 methods. If you want, please click this link.
Plan to root your Android phone? Please wait a little bit. Is your phone rooted? If you are not sure, please use these approaches to check your phone.
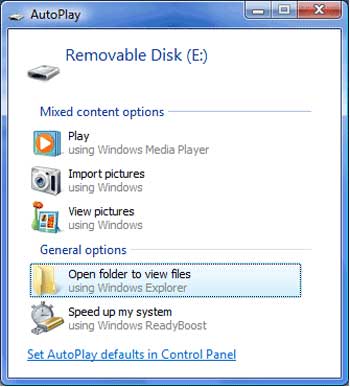
AutoPlay is a built-in function on the Windows PC. It will pop up when you connect your device to the computer via USB. It is convenient to transfer media files from the mobile device to the computer. If you want to back up Android before root using AutoPlay, please don't miss this part.
Step 1. Connect Android to PC
Please use an available USB cable to connect the Android device to the PC, and choose the "MTP" option on Android.
Step 2. Select Android Files
Choose the "Open folder to view files" option on the AutoPlay window. Then you can directly select the desired data.
Step 3. Transfer Files to Computer
Once selected, please drag and drop them to the desktop or a new folder. It will begin to transfer the files from Android to the PC.
Read also:
With the help of these 4 approaches, you can swiftly back up Android to the SD card.
Read this article to learn effective ways on transferring files between Android phones via Wi-Fi.
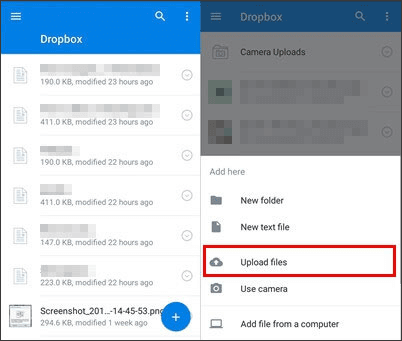
Dropbox can help you upload files from Android to its cloud space and share your files with others conveniently. It can work with DOC files, videos, pictures, and more. As long as you sign up to Dropbox, you can get 2GB of free storage space. However, it cannot back up your messages, contacts, and call logs.
Step 1. Open Dropbox
After installing Dropbox on your Android phone, please open it and sign up. If you have registered it, you can directly log in to the app.
Step 2. Complete Backup before Root
Click the "Plus" > "Upload files" option, and you can select the files you want from your Android phone. After that, the app will store your uploaded files automatically. And you can view them on Dropbox at any time.
Further reading: Want to transfer contacts from Android to Outlook? Please check it out.
G Cloud Backup is a mobile backup app for contacts, messages, documents, and more. It offers 1GB of free cloud space for users in the beginning. Moreover, it can back up the camera photos, WhatsApp data, Viber files, and more. By the way, you can get the 50MB bonus daily and earn up to 10GB.
Step 1. Launch the Backup App
You can download it from Google Play. Then install and launch it on the Android phone.
Step 2. Register Your Account
You can sign up for an account on the phone. Then allow it to access your files, and select the content you want.
Step 3. Transfer Data to Cloud Storage for Backup
After selected, please tap the "Save" icon. It will start to upload your selected files for backup.
![]()
Maybe you need: Dislike using a USB cable? You can now transfer files from the PC to the Android phone without USB.
It is simple to back up Android OS before rooting via the Google account. Without download apps on Android, you can add your Google account to the Settings app, and then enable the backup feature. Your files will be synchronized to the Google account right away. Besides, you can get more space by upgrading your plan.
Step 1. Open the Settings App
Please go to Settings on the Android phone. Then choose the "Accounts and backup" > "Backup and restore" option.
Step 2. Enable Google Backup
Switch on the "Back up my data" icon on the screen, and click the "Backup account" option to type your Google account.
Step 3. Back Up Android Data to Google
Tap the "Back up now" icon to activate the backup procedure.
![]()
You might like: It is effortless to install APK on Android from the PC. Let's get the tips.
Now, this article has introduced all useful backup methods to you. Choose one way you need most to start your backup before rooting, and you will no longer be concerned that rooting will erase your Android phone. By choosing this Android manager - Samsung Backup and Restore, you can enjoy seamless Android backup forever.
Related Articles
How to Recover Android Data without Root?
5 Best Samsung Backup Apps and Software in 2023
[Informative Introduction] 8 Top Options of Android Data Eraser Software
Most Recommended Samsung Kies Alternative Are Here (6 Helpful Tips)
ZTE Backup and Restore: 4 Fast Backup and Restore Ways You Can Choose
How to Back Up and Restore Android Phone/Tablet on Computer? (5 Ways)
Copyright © samsung-messages-backup.com All Rights Reserved.