An iPhone takes pictures of higher quality than any other mobile device because of its camera quality. As we know, Apple never compromises on quality. If you own an iPhone, you surely love taking photos, but with time, the storage will eventually get full, and no more photos can be added.
Now you are thinking of deleting some of the pictures to create more space. But can that help? Not really, since you'll only delete two to three pictures and leave the rest as you can't bring yourself to delete many of them. So, the best way through this dilemma would be to transfer the pictures to an external device like an SD card.
That's cool as you'll be sure your photos are safe, and anytime you wish to look at them, you can easily get them from an SD card. We'll help you know how to transfer photos from an iPhone to an SD card with/without a computer in easier ways.
If you own a computer, you stand a chance to move your iPhone pictures to an SD card. There are several ways to go about it, and below are the perfect methods to transfer iPhone pictures to an SD card with a PC.
The simplest way to move pictures from an iPhone to an SD card is via this iOS Transfer software. This is an all-around iOS data manager with plenty of features to ensure an efficient and safe transfer. This software can help you move your iPhone photos to your computer with original quality and formats.
Besides, it supports a wide range of iOS devices, like iPhone 14 Pro/14/13/12/11/X/9/8, iPad mini, iPad Air, iPad Pro, and more. What's more, you can also transfer your music, videos, contacts, messages, and more from your iOS device to a computer.
Key aspects of this software:
- Directly export photos to your SD card or computer from an iPhone device.
- Support Apple picture formats like JPEG, HEIC, PNG, JPG, GIF, and more.
- Allows you to preview camera roll images as you select the ones to export.
- One-click iPhone data backup and restore on PC/Mac.
- Compatible with most iPhone models and SD cards.
- Support contacts, notes, videos, books, calendars, bookmarks, etc.
Download this iPhone photo transfer software.
Here's how to move images from your iPhone device to your SD card using this program:
Step 1: Run the program on the computer after downloading and installing it.
Step 2: Connect the iPhone device to the computer via a USB cord and click "Trust" when prompted to trust the PC. After that, take the SD card reader together with the inserted SD card and connect it to the same computer. When recognized, you'll see the device's info on the screen.
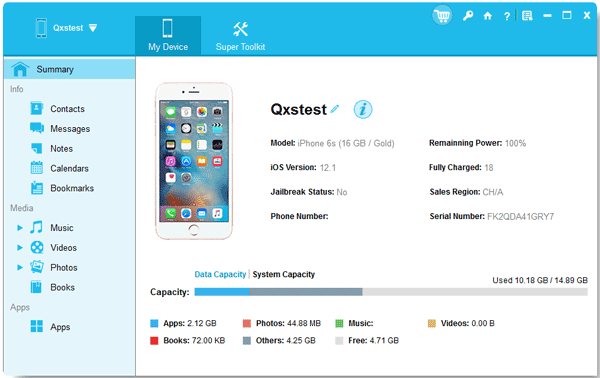
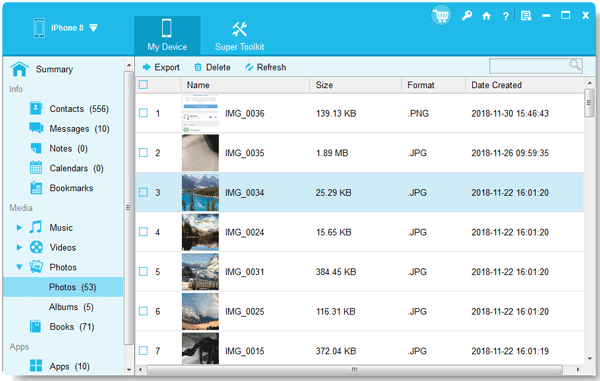
Step 3: Choose the pictures folder from the left sidebar, open and view them from the right panel. Tick the specific images to transfer and tap the "Export" icon. Afterward, choose the "SD card" as a storage path from the pop-up window to transfer the pictures to your SD card.
Further reading: How to Transfer Photos from Android Phone to External Hard Drive [4 Simple Ways]
iCloud helps in keeping some of your important information like files, photos, and more in a more secure way. Besides, it's available on all iOS devices. So, you can easily sync your images with iCloud and transfer them to an SD card.
Here is how to move pictures to your SD card via iCloud:
Step 1: Go to your iPhone device, open the Settings app, then click on "[your name]".
Step 2: Click on "iCloud" > "Photos", and then toggle on the "iCloud Photo Library" option to transfer pictures available on your iPhone to iCloud.
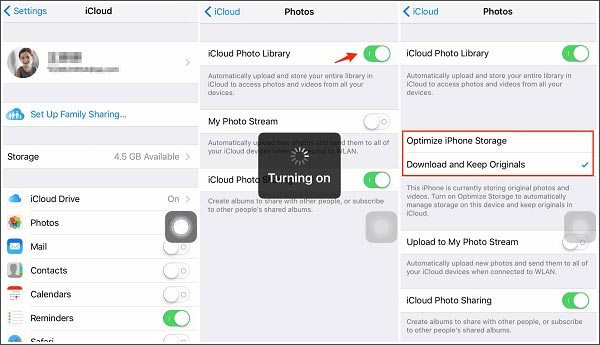
Step 3: Connect the SD card reader to your computer after inserting the SD card into it, then go to iCloud.com using any web browser from your computer.
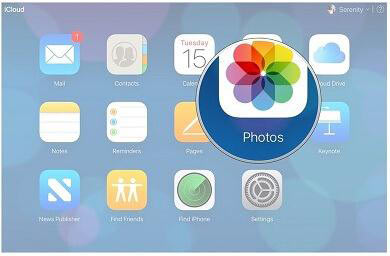
Step 4: Sign into your iCloud account using the same login credentials used on the iPhone. Click on the "Photos" icon and select the pictures to transfer. Set the destination to be an SD card, then download the images.
You might need: There are 6 effective methods that you can use to copy your Android photos to your MacBook. Open this link if needed.
It's not a must for you to use a third-party tool or iTunes to move your photos from an iPhone device to your SD card. You can still use File Explorer on Windows PC to complete the task. Most smartphone users at least know this data transfer method, and many would choose it since it isn't very complicated. File explorer allows you to access the internal storage of your iPhone and manually copy pictures and videos from an iPhone camera to an SD card.
Here are steps to move photos from your iPhone device to your SD card via Windows File Explorer:
Step 1: Get an SD card and insert it into the SD card reader. Afterward, connect the reader to the Windows computer. Then Use a USB cable to connect the iPhone device to the same computer and ensure it recognizes it.
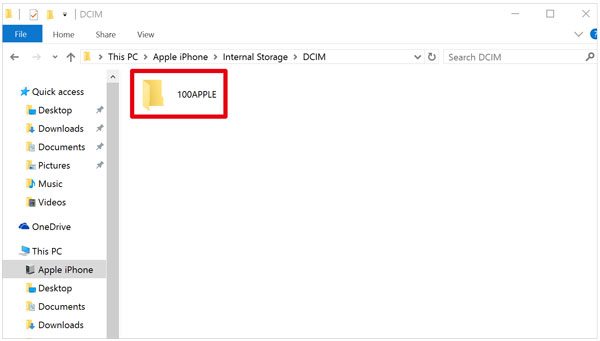
Step 2: Head to the "This PC" option on your computer. Look for the name of your iPhone on the computer; it's usually located next to the computer's local disks. Open it and click on the "Internal Storage" option, then on "DCIM" and proceed to the "100APPLE" option.
Step 3: Now, copy pictures from the iPhone and paste them into the SD card by pressing the "Ctrl" and "C" keys.
Learn more: With this tutorial, you can swiftly transfer images from an iPhone to a flash drive. Let's check it out.
For Mac users, you're not short of options either. You can still go the free way by using the Photos App and exporting your pictures to an SD card seamlessly. What's more, it's quite reliable too.
Step 1: Connect the iPhone to Mac via a USB cable and trust the PC when asked.
Step 2: Go to your Mac and open the Photos app. You'll see all Camera Roll images from your iPhone.
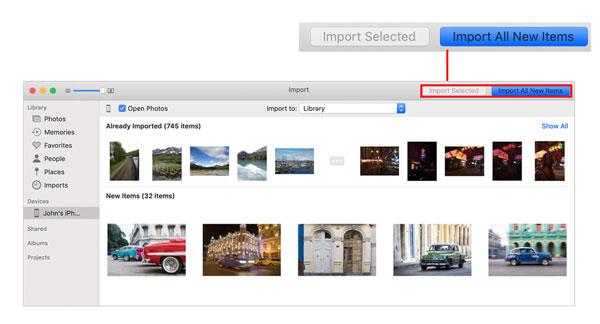
Step 3: Tap the "Import All/Import Selected" button to proceed. Then input the SD card into the SD card reader, then connect it to your Mac PC.
Step 4: Choose an SD card as your destination for keeping the pictures and click "Import".
If you don't have a computer or don't want to use it, you can still share your photos to external storage, like an SD card with a lightning adapter. No Wi-Fi or cellular is needed here. The process is quite simple for those who don't want to use a computer.
The steps for transferring photos from an iPhone an SD card without a computer are as follows:
Step 1: Head to the "Photos" application on an iPhone, click "Select" from the top, and choose the images you wish to transfer.
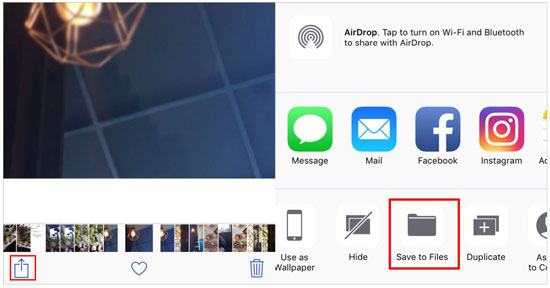
Step 2: Install your micro SD card to a lightning adapter, and insert the adapter into your iPhone. Then select the "Share" tab and the "Save to Files" option.
Step 3: Once done, select the location path as SD card and hit "Save". Sometimes, the option for an SD card comes with a USB icon and is usually labeled "NO NAME".
Hopefully, you'll be able to move your images from your iPhone to an SD card without difficulty. We have highlighted many ways of doing that with or without a computer. We believe that at least one method suits you. But if you want to make things easier, try the iPhone Transfer software since it's a strong tool for transferring files from iOS devices to SD cards and computers.
Related Articles
How to Transfer Photos from iPhone to iPhone in 5 Ways [Ultimate Guide]
How to Transfer Photos from Phone to Laptop without USB [5 Ways]
Is Google Photos Backup Stuck? Use These 8 Methods to Fix It Fast
Solved: Help You Fix Photos Disappeared from Android Phone without Hassle
How to Restore Photos from Mi Cloud? [Advanced Guide]
9 Google Photos Alternatives: Manage Photos and Videos Easily
Copyright © samsung-messages-backup.com All Rights Reserved.